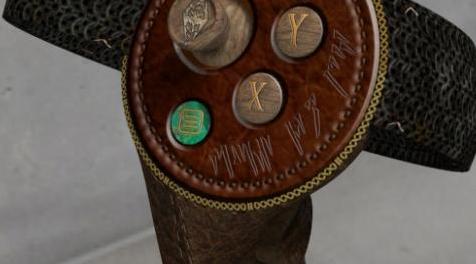
上古卷轴5:重置版MOD Oculus Touch皮肤更换 - OTSR - Chainmail
MOD介绍:
VIVE VERSION = www#nexusmods#com/skyrimspecialedition/mods/16528?tab=files
如何。
首先,将文件解压缩(7zip,Winrar等)到您选择的目录中。
然后导航到SteamVR文件夹,该文件夹包含控制器的外观。
C:\ Program Files(x86)\ Steam \ steamapps \ common \ SteamVR \ resources \ rendermodels
(这可能会因您的安装而有所不同,但以上情况很常见。我的是D:)
打开文件夹,oculus_cv1_controller_left
查找文件external_controller01_col.png
将现有文件重命名为external_controller01_col#png#xxx(如果您希望恢复原始文件,则始终建议备份现有文件)
将下载的未压缩文件复制到此文件夹。
然后:
打开文件夹,oculus_cv1_controller_right
查找文件external_controller01_col.png
将现有文件重命名为external_controller01_col#png#xxx(如果您希望恢复原始文件,则始终建议备份现有文件)
将下载的未压缩文件复制到此文件夹。
同样的下载进入每个文件夹,因为它保存两个控制器的数据。
当你第一次装载天际VR时,它们可能看起来很暗,这是因为在开始“无效”场景中没有主要光源,一旦进入“洞穴”,你就会清楚地看到它们。
————————————————————————————————————————————————————————
VIVE VERSION = www#nexusmods#com/skyrimspecialedition/mods/16528?tab=files
How to.
Firstly, Uncompress (7zip,Winrar etc) the file to a directory of your choice.
Then navigate to the SteamVR folder which holds the skins for controllers.
C:\Program Files (x86)\Steam\steamapps\common\SteamVR\resources\rendermodels
(This may differ depending on your install but the above is usual. Mine is under D: )
Open folder, oculus_cv1_controller_left
Look for the file external_controller01_col.png
Rename the existing file there to external_controller01_col#png#xxx (always advisable to back up existing files in case you wish to revert to the original)
Copy the downloaded uncompressed file to this folder.
Then:
Open folder, oculus_cv1_controller_right
Look for the file external_controller01_col.png
Rename the existing file there to external_controller01_col#png#xxx (always advisable to back up existing files in case you wish to revert to the original)
Copy the downloaded uncompressed file to this folder.
The same download goes into each folder as it holds the data for both controllers.
When you first Load up Skyrim VR, they may appear to be very dark, this is because in the start "void" scene there are no major light sources, once into the "cave" you'll see them clearly.
资源查找:
最新文章
点击热榜
推荐问答
- [问答]情商课一般几岁孩子去学比较好?
- [问答]怎么看自己孩子情商低不低?孩子情商低的10大特征是真的吗?
- [问答]我想提高情商和说话要看什么书?
- [问答]顾三月情感课程pdf谁有?
- [问答]谁有情感培训课程资源?
- [问答]如何看卖情感课程正规还是不正规?
回复区
昵称:
邮箱:
内容: